Introduction: Why Drywall Repair Matters
Proper drywall repair before painting is the foundation of a beautiful, long-lasting paint job. In Ottawa homes, where temperature changes and humidity can cause walls to shift and crack, addressing drywall issues before painting is essential. Skipping this step leads to visible imperfections, premature paint failure, and costly rework. This guide will walk you through everything you need to know about drywall repair before painting.
Common Drywall Problems in Ottawa Homes
1. Nail Pops and Screw Pops
Common in Ottawa homes due to temperature and humidity changes:
- Nails or screws that have pushed through the drywall surface
- Creates small bumps or cracks
- Often appears after first winter in new homes
2. Cracks
Various types of cracks can appear:
- Hairline Cracks - Small, surface-level cracks
- Stress Cracks - Usually at corners or joints
- Structural Cracks - Larger, may indicate foundation issues
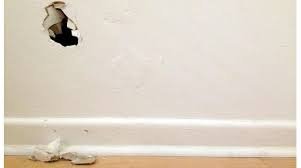
3. Holes and Dents
Common causes include:
- Furniture damage
- Door handle impacts
- Removed fixtures or hardware
- Accidental damage during renovations
4. Water Damage
Ottawa's climate can cause:
- Stains from leaks or condensation
- Soft or crumbling drywall
- Mold or mildew growth
- Bubbling or peeling paint
5. Texture Issues
Problems with existing textures:
- Peeling texture
- Inconsistent texture patterns
- Damage from previous repairs
Essential Tools and Materials
Tools You'll Need
- Putty knife (various sizes: 2", 4", 6")
- Drywall saw or utility knife
- Sandpaper (120, 150, 220 grit) or sanding sponge
- Drywall compound (joint compound or spackle)
- Drywall tape (for larger repairs)
- Primer (stain-blocking for water damage)
- Paint brush and roller
- Drop cloths
- Safety glasses and dust mask
Materials
- Joint Compound - For larger repairs and taping
- Spackle - For small holes and dents
- Mesh Tape - For reinforcing joints and cracks
- Drywall Patches - For larger holes
- Primer - Essential before painting repaired areas
Step-by-Step Repair Process
1. Preparation
Before starting repairs:
- Clear the area and protect floors with drop cloths
- Remove any loose material around damaged areas
- Clean the surface to remove dust, grease, and debris
- Identify all areas that need repair
2. Fixing Small Holes and Dents
For holes smaller than 2 inches:
- Clean the hole and remove loose material
- Apply spackle or joint compound with a putty knife
- Smooth the surface, slightly overfilling
- Let dry completely (usually 24 hours)
- Sand smooth with fine-grit sandpaper
- Apply primer before painting
3. Repairing Larger Holes
For holes 2-6 inches:
- Cut a clean, square or rectangular opening
- Cut a patch from scrap drywall slightly larger than the hole
- Place patch behind the hole and secure with screws
- Apply joint compound over the patch and surrounding area
- Embed mesh tape over the repair
- Apply additional coats of compound, feathering edges
- Sand smooth when completely dry
- Prime before painting
4. Fixing Cracks
For cracks in drywall:
- Widen the crack slightly with a utility knife (creates a "V" shape)
- Remove any loose material
- Fill with joint compound
- Apply mesh tape over the crack
- Apply additional compound, feathering edges
- Sand smooth when dry
- Prime before painting
5. Fixing Nail Pops
To repair nail or screw pops:
- Drive the nail/screw slightly below the surface
- Apply joint compound over the area
- Smooth with putty knife
- Let dry and sand smooth
- Prime before painting
6. Addressing Water Damage
For water-damaged drywall:
- Identify and fix the source of water
- Remove damaged drywall if soft or crumbling
- Allow area to dry completely
- Apply stain-blocking primer to prevent stains from showing through
- Repair with joint compound if needed
- Prime again before painting
Sanding and Smoothing
Sanding Techniques
Proper sanding is crucial for a smooth finish:
- Use fine-grit sandpaper (150-220) for final sanding
- Sand in circular motions for small areas
- Use a sanding block for flat surfaces
- Feather edges to blend with surrounding wall
- Remove all dust before priming
Dust Control
In Ottawa homes, proper dust control is important:
- Use a vacuum with HEPA filter
- Wipe surfaces with a damp cloth
- Ensure good ventilation
- Wear a dust mask while sanding
Priming Before Painting
Why Primer is Essential
Primer serves several critical functions:
- Seals repaired areas to prevent paint absorption
- Blocks stains from showing through
- Provides uniform surface for paint
- Improves paint adhesion
- Ensures consistent color and finish
Choosing the Right Primer
- Stain-Blocking Primer - For water damage or stains
- Multi-Purpose Primer - For most repairs
- High-Hide Primer - For covering dark colors or patches
Common Mistakes to Avoid
1. Skipping Primer
Never skip primer on repaired areas. It's essential for a professional finish.
2. Not Allowing Proper Drying Time
Rushing the process leads to poor results. Allow each step to dry completely.
3. Over-Sanding
Too much sanding can damage the drywall paper. Sand just enough to smooth the surface.
4. Not Feathering Edges
Feather compound edges to blend seamlessly with the surrounding wall.
5. Ignoring the Root Cause
Fix underlying issues (like water leaks) before repairing drywall.
When to Call a Professional
Consider professional drywall repair in Ottawa when:
- Repairs are extensive (large areas or multiple rooms)
- Structural issues are suspected
- Water damage is significant
- You lack the time or skills for proper repair
- You want guaranteed results
Timeline for Drywall Repair
Typical timeline for drywall repair before painting:
- Small Repairs - 1-2 days (including drying time)
- Medium Repairs - 2-3 days
- Extensive Repairs - 3-5 days
Factor in drying time between coats and before priming.
Cost Considerations
Drywall repair costs in Ottawa vary:
- DIY Small Repairs - $50-$200 in materials
- Professional Small Repairs - $200-$500
- Professional Extensive Repairs - $500-$2,000+
Professional repair often saves money by preventing paint failures and rework.
Conclusion
Proper drywall repair before painting is essential for achieving professional results in your Ottawa home. Taking the time to properly repair cracks, holes, and other imperfections ensures your paint job looks great and lasts for years. Whether you tackle repairs yourself or hire professionals, following these guidelines will help you achieve the best results.
Need professional drywall repair before painting? Contact OTT Painters Ottawa for expert drywall repair and painting services throughout Kanata, Barrhaven, Nepean, and all Ottawa areas.